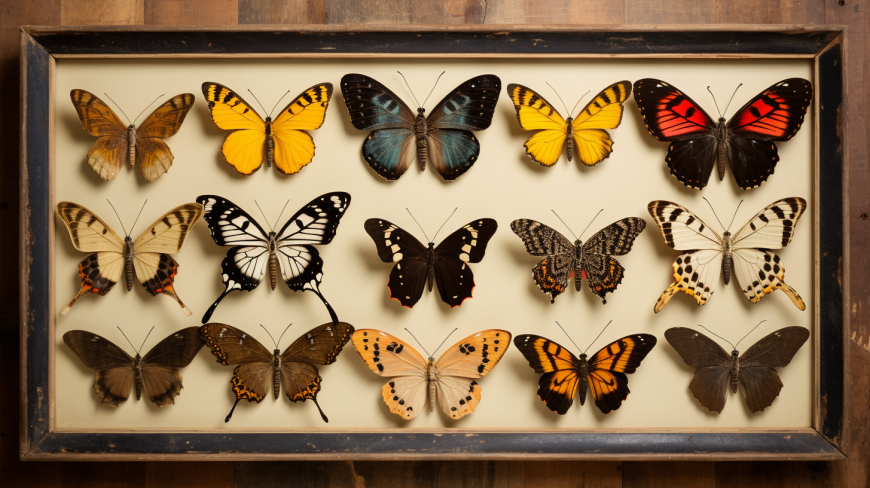
Matt Hall

Beginner Hobbyist’s Guide: Turkey Mounting

This guide is meant for aspiring turkey mounting hobbyists in need of an overview in this specific area of taxidermy. Each step of the process has its own unique set of principles and intricate techniques that could take years of practice to master. However, this should not deter you from experiencing the fun of preserving your own hard earned trophy. Like any professional turkey taxidermist out there, one always needs to start from learning the basics.

Turkey mounting is one of the many areas you can explore in the field of taxidermy as a hobby. More than just hunting, harvesting, and preserving physical evidence of your glorious hunt, turkey mounting is an art. There are several ways to mount a turkey and the list of possibilities goes on as modern taxidermy practices continue to improve. Furthermore, the learning curve required to be successful at the hobby is not an uphill battle.

The process of mounting your turkey from harvest to the actual mounting is simpler than you might think. If you are seriously interested in taking the turkey mounting as a hobby, you are fortunate to live in an age where modern convenience has made the process simple. Learning how to mount your turkeys is a rewarding experience.

Unlike living during Victorian or Edwardian era, access to information about quality mounting techniques is no longer a difficult task. Convenient access to the internet for beginning hobbyists to information can help their outputs achieve commercial quality. Yes, it is feasible to tap into a niche market of turkey enthusiasts but that is another story.

The General Steps of Turkey Mounting:               

1. Tools for the Hunt

Your Gun

You would need a bird hunting rifle to catch your first gobbler. While that fact is a no brainer, you have to be meticulous about the guns you use. The pellets that come out of your gun must be tight enough at reasonable distances. You would not want a turkey with several holes especially on specific parts of the body you wanted to preserve. That kind of turkey makes it a difficult specimen to clean or even be worth preserving.

You need to practice your aim and get used to the gun you would be working with. Landing a critical headshot the first time is crucial. The critical hit prevents the gobbler from suffering further. It also prevents it from struggling on the ground. You do not want its feathers soaked in blood, dipped in mud, or ruffled. These events add to the difficulty of cleaning and loss of aesthetic value of the specimen.

Your Knife

Maybe you managed to land a good shot and upon approach to the dying creature, you see it still living and possibly still strong enough to ruin its feathers. You can wait it out, end it with another shot, or cut through its neck.

Turkeys, like other birds, do not possess much blood on them. Having too much blood just adds to their weight and makes it difficult for flight. You can expect your incisions made would be less bloody. A sharp knife would be a good tool to make the process cleaner. Whatever method works for you, just make sure you keep the parts you intend to preserve clean.

The Cooler

The size of the container should be proportionate to the gobbler you expect to nab. At least, just big enough to make sure that no tail feathers get disturbed when you place the whole turkey. Preserving the turkey’s body after death is your next priority. A dead body encourages bacteria and fungi to grow and hasten decomposition.

You could also attempt a field dressing. This process saves you time from separating the meat for food and parts you intend to preserve. However, field dressing requires practice and should not be attempted when unsure, especially when you only have your precious prize to work with. Start developing your field dressing skills with turkeys not intended for mounting until you are confident enough to apply it to your future prizes.

2. Selection of Specimen Parts

There are several ways to mount a turkey but these can depend on what part you intend to mount. Selecting the parts you intend to preserve can influence your decision making during the hunt. As an example, selecting only the spurs for preservation removes your concern for the feathers getting dirtied.

Furthermore, your cleaning efforts will also be influenced by the parts you intend to preserve. Spurs are far easier to clean and handle than feathers. On the other hand, preserving the feathers offers more aesthetic appeal as a trophy than spurs.

Tail feathers, spurs, beard, and capes can be mounted singly or in combination and this all depends on your preference. You could even mount a whole turkey. However, handling each parts entails different caring requirements which are crucial for the mounting process to be a success.

So before you start hunting, best to have an idea on what part you intend to save.

3. Care of Specimen

The level of care needed to mount the specimen can depend on the parts opted to save. The process starts from the moment you took hold of the specimen. Tail feathers require gentle manipulation so as not to disrupt their natural aesthetic appearance.

Examine the turkey’s body and remove anything that could be classified as dirt or debris. Have a toilet paper ready to remove possible poop coming out of the creature’s anus. The turkey’s sphincter will relax upon death and any fecal matter formed will go out. It is important to maintain the specimen in good condition rather than create more reasons to clean it.

Store the specimen in a cool place when not in used. Never leave your cooler open with a dead turkey in it, opportunistic scavengers like dermestid beetles and flies can be attracted the scent of death. Infestations could be difficult to deal with but not impossible to resolve. However, preventing opportunities for infestations to happen is a lot more easier than repairing the damages these pest could do.

Frequent unnecessary handling of the specimen can increase the chances of getting the parts you wanted to save ruined. As a rule, only handle it when it is a necessary part of the mounting process.

4. Preparation and Skinning

This is one of the most laborious parts of the process. Poorly skinned specimens when mounted do not last long on display. Forgetting or missing out pieces of muscle or fat tissue during skinning of the specimen part can invite rapid decomposition. Be meticulous when taking out muscle or fat tissues as small pieces of flesh are enough to ruin the entire specimen.

The best way to avoid paying for frequent restorations on your mounted turkey is having it cleaned, skinned, and dried right the first time.

Tail Feathers

Make sure you cut out the flesh and bony parts near the bases of the fan just above the anus. Slowly remove muscles and fat until you work your way towards the bases quill feathers. Use a small sharp knife for the intricate work and for better control. Scalpels, a small curved knife, and metal brush are one of the best tools for the job.

Locating the tail bone and getting a feel on how the quills are arranged can guide you where to cut. Taking out the tail bone fast can result to large quills detaching.

The small curved knives and scalpels are for taking out large to medium sized fleshy parts from the specimen. This gives users more control with the force they need to manipulate both specimen and tool. On the other hand, metal wire brushes are used to take out the fleshy parts that your knives or scalpels could not reach.

Beards

Locate it on the turkey and pluck it as a single unit gently from the base. Take out the excess skin tissue with a knife. Do this after you placed the body for a few hours in the cooler. Taking out the beard fresh from death can make the bundle fall apart as body temperature has not dissipated.

Spurs

There are several ways to extract the part from the specimen. You can saw your way through the bones or use plies to take it out. The turkey’s spurs are only thick keratinized sheaths covering its bones. The method of extracting the spurs will depend on how you intend to use the spurs. For spurs taken out by plies, you can fill in the hollow portion with epoxy.

Cape

Extracting the whole unit takes much more work due to its size and number of feathers that could be damaged when extraction is done poorly. Make an incision from the breast mid-line and start separate the skin from the inner muscles. The first incision can reach up to the neck and to the bottom. Skin the creature and perform meticulous separation of tissues. Best to see a separate guide for this part due to the associated intricacies involved.

When mounting it as a whole turkey, determine what form the final product would assume. A simple standing position is simpler to accomplish compared to mounting it in a strutting position. Mounting a whole turkey does not necessarily mean having all of its parts intact. There are artificial turkey parts you can customized for the finished product.

5. Dry Preservation

The success of the drying process is proportional to the lifespan of your mount. The presence of moisture encourages growth of microorganisms responsible for decomposition. Borax serves as a drying agent often recommended by taxidermists. It can absorb moisture when in contact with moist areas in your specimen. De-greasing solutions come help remove most unwanted contaminants from the specimen.

De-greasing solutions help ensure you take out all the oils, dissolve tissues, dirt and debris from the specimen part. With a bucket of cold water and dish washing soap, dip and soak the mechanically cleaned portion of the specimen for 15 to 60 minutes. For tail feathers, use a rubber band to keep the rest of the feather in order. Coleman CampFuel is an example of a de-greasing solution you can work with.

Rinse the specimen until the de-greasing solution is removed. The length of soaking and degreasing solutions recommended can vary from experienced turkey taxidermist.

Borax’s chemical name is known as Sodium tetraborate. It is the dehydrated form of boric acid used in various industrial applications. Other than absorbing moisture, it also contains anti-fungal activity and insecticidal properties. You can order this cheap multipurpose cleaner from Amazon from brands like 20 Mule Team Detergent Booster.

If you are working with a specimen that has a lot of dirt and blood, washing it with dish washing soap and water can be done to remedy. Make sure gentle manipulation is observed during the process. You can reposition the tail feathers for straightening. Lastly, blow dry using low heat before applying borax.

Dry your specimen for at least 2 weeks before mounting. Store the specimen in a cold and dry area. Avoid exposing it on high humidity, sunlight, and damp areas as these can contribute to the degradation. Check on the specimen every now and then to see any infestation.

A poorly dried specimen results from a lack of attention to detail. When a small space of fleshy part does not come in contact with a drying agent, bacterial growth can result and a distinct odor could form that attracts unwanted pests.

Once cockroaches, dermestid beetles, or flies start to do their work on your specimen, reparation would be difficult. Worse, restoration will not bring back the old aesthetic appeal. Attracting unwanted pests can happen all throughout the process. It starts from the moment you secured the dead turkey up to post mounting.

Dry the legs in the freezer or cool environment to prevent a white or silver scaling on the surface. Legs dried on hot or humid environments allow separation of scales from tissue beneath prominent.

6. Actual Mounting

The actual mounting process can depend on what turkey part you are working with. Fan mounting is often practiced when working with tail feathers. It is a simple method and popular among most turkey enthusiasts. The method is not as complicated as cape mounting or whole turkey mounting.

Fan Mounting

For fan mounting, start by locating the base of the quills again. On top of a sheet of cardboard box, fan out the tail feathers. Secure the part with push pins to let it remain assuming a fanning position. Remove the excess Borax with a brush and apply Bondo.

Bondo is a car body putty mixture you can apply at the base of the quills to secure a fanning position. Spread a layer of one fourth to one half inch of Bondo over the base of the quills. Once it hardens, you can remove the push pins. Set it aside for a few days (a week at most).

Commercial mounting boards are available for finishing your fan mounting. Once the bondo hardens at the base of the quills, you drill in a screw and washer over the mounting board. Usually, another piece of plaque is available for commercial mounting boards to hide the screw and washer. A hole for the turkey’s beard often available along with fan mounting boards.

Legs and Spur Display

After drying the legs using Borax for 2 weeks, you can position both legs on top a mounting board. Use superglue to secure it in position. Turkey legs contain less muscle tissue and less fleshy in general. This type of display attracts less infestation and makes it easy to maintain during cleaning.

Coloring the legs with spray paint is usually not advisable, especially for beginners. Trying to match or enhance the color of the real thing can counter-productively make it more artificial in the process. Depending on your preference, non-glossy coatings are usually enough to exemplify natural color of the specimen.

Whole Body Mount

Considered more tedious to accomplish compared to other turkey mounts. However, this one offers a more lively presentation of the achievement compared to the rest. Whole body mounting can be done through the same principles mentioned. You would entertain the use of artificial body parts. Find out more about body mounting from Todd Triplett’s book “The Complete Guide to Turkey Taxidermy: How to Prepare Fans, Beards and Body Mounts”.

7. Maintenance

Keeping your mount in good condition can make it last for decades. Always keep an eye out for possible infestations and other conditions that can cause degradation:

Display the mount in an area not exposed to direct sunlight.

Direct sunlight over time can contribute to your mount’s feathers being bleached. Living birds require sunlight exposure to produce necessary vitamins for metabolism. This keeps their feathers displaying distinct color pigments and themselves healthy. However, upon death, the process stops and the saturation of colors in the feather will depend on environmental factors.

Further exposure to sunlight only degrades the pigments; this makes the feather prone to sun bleaching from the UV rays.

Storing in a damp area.

Damp areas encourage fungal growth. When accompanied by low temperatures and darkness, mold growth becomes rapid and can ruin your mount. Mold growth in your mouth may be difficult to detect early because the damage it does runs slowly. Fungal growth would usually favor internal areas of the specimen which prolongs its stealthy growth.

By the time you can visually appreciate the impact of mold growth, the damage may already be extensive causing more difficulty for restoration work. Worse, the mount is beyond salvation.

Other Products That Contribute to a Good Mount:

Habitat Bases

Habitat Bases are not a mandatory requirement when mounting your trophies. But they do add to the overall aesthetic impact of the set, especially when you managed to mount a strutting turkey in a picture perfect background.

Habitat bases for turkey mounts can add diversity to your collection. You could opt for commercial bases usually sold online through Amazon or eBay. You could also create the bases yourself, though the process may also take another set of learning curves. Replicating the scenery may take a bit more of your time and effort but nothing that is worth it comes easy anyway.

The materials needed can come from a collection of wood, stones, and dirt. You may also need to paint plants in the composition. There is no limit to how much you want to invest in recreating that natural scenery.

Artificial Head, Body and Limbs

Whole turkey mounts would be difficult to make without these artificial parts. Preserving turkey heads, as an example, are more difficult to do than just opting for an artificial head. Artificial parts make take out some of the natural feel but these parts save you more time.

Artificial heads and limbs offer the taxidermist more creative options to customize their turkey mounts. These parts are available for personalized coloring and can potentially enhance the entire set. However, coloring the parts to match the natural counterpart is not an easy task. Beginner taxidermist often make the common mistake of coloring the parts too well that it no longer looks natural when viewed together as a whole.

But you can minimize such problems by taking a picture of the turkey during the hunt. This provides you the basis on color choice and other details to try out.

Limitations of Turkey Mounting

Producing better mounts requires years of dedication and practice for the art. The amount of time you invested in refining your turkey taxidermy skills is proportionate to the quality of your output. You may have to skin countless turkeys before you could achieve commercial levels.

As a turkey taxidermist, there are several ways to mount your specimens and imagination is often your limit. This guide only covers the basic principles of turkey mounting. There are many more principles and techniques you have to figure out for yourself. Turkey taxidermy is an applied art that could only be mastered through hands on experience.

Good luck on your first turkey!

Product Review: Skull Hooker Little Hooker European Mount Display Steel

Casual observers would deem all wall-mounted deer plaques just the same. But a skilled taxidermist would know the distinct character and the message it conveys merely by looking at the deer mount. When the deer hunting season begins, all hunters go and try to land a few deer. At the end of the day, they would always look forward to keeping one as a trophy.

Skull Hooker’s Little Hooker European Mount Steel Display is a popular mount among experienced taxidermists. Learn more about this product and some great tips to show off:
Skull Hooker Little Hooker European Mount Display Steel

Product Features

Sleek Design

The Little Hooker is a modern and lustrous mount that can carry small to medium-sized European trophies. It is made of strong power-coated steel in two striking colors. The first color, Robust Brown would look dashing against a brick wall while the Graphite Black would definitely shine and draw attention even on plain-colored walls.

Customization

Because the pose of your trophy matters, the Little Hooker allows complete customization both up and down and left and right. Remember, in taxidermy, the pose of the mount matters. It is all about what you want to say through the pose of your piece. The Little Hooker gives you the freedom to showcase your craftiness and also bring out the ferociousness and cleverness of the animal.

Size and Weight

This state-of-the art deer mount weighs only 0.6875 lbs, making it perfect even for walls made of light materials. The Little Hooker is designed specifically for smaller games. This mount can perfectly display a large-sized deer skull. You can also use the mount for other small trophy game species such as aoudad, black bear, hogs, alligator, and antelope. Even exotic medium game trophies like gazelles and impalas will look striking on the Little Hooker.

Installation Process

Unlike other mounts, it doesn’t take much effort to install the Little Hooker. It only takes three steps to finish the installation process. Before you start, prepare the recommended tools: Phillips screwdriver and a 3/8 inch wrench.

  1. The first step is to locate the stud and align it with the wall plate. Make sure that the screws are vertically mounted onto the wall. This is very important. You should see to it that the wall plate’s screw holes are not mounted at an angle. Use supplied dry wall anchors or screws mounted in studs.\
  2. Next, insert the lock washer included in the kit in between the prong and arm screw holes. Lightly tighten the screw and lock nut as you are inserting. See to it that the welded side of the prong faces down or is away from the wall plaque. Do not tighten it completely. Insert the prong of the arm into the back of the skull. Insert the middle arm into the larger hole and the side arms should rest within the small depressions which are on both sides of the larger hole.
  3. Lastly, insert the arm into the wall plaque’s canister to support the skull and arm. Decide on the angle of your trophy and finally fully tighten the screw and lock nut.

The Little Hooker’s arm swivels to each side so you can customize the angle of your trophy. You can choose an upright or a laid back look. Take advantage of the size of the trophy’s rack to give it a natural touch.

Remember to always prioritize safety as you are in the middle of the installation process. Always secure the prong into the skull. Ensure that the lock nut is very tight before you hang the skull on its own. Make sure that the location of the skull is not cut or damaged to ensure proper fit.

About Skull Hooker

Skull Hooker is brand to trust when it comes to European skull mounting. Their products are all professionally crafted brackets that can show off your trophy game animals in the most elegant yet realistic way. The company manufactures sturdy products that are quick and simple to install.

Skull Hooker came up with a unique mounting system that allows people to finish the installation process in less than an hour. It is an affordable alternative to professional mounting. Skull Hooker gave the hunters the chance to secure their displays on their own without breaking the bank.

Cleaning Your Kill

European skull mounts are the trend. Your huge 8-point buck will definitely look striking up on that wall on your Little Hooker if you know how to do it correctly.

Slow down on the excitement if you already have your kill. It takes a little bit of patience before you can turn it into a remarkable trophy. First, with a skill saw, make a clean cut on top of the deer’s head. Keep the head inside a bag and freeze until later.

When you’re ready, take a big boiling pot and place the head of the deer inside. The boiling pot should be tall enough. Change the pot if the deer’s nose is touching the bottom. Fill the pot with water until everything is covered except the horns. Make sure it only blows slowly to avoid causing damage to the skull and causing the deer’s teeth to fall off. Take as much time to ensure that the skull is thoroughly clean. Check the pot every 2 to 3 hours and scrape the meat off the skull every now and then. Refill the pot with water to replace water loss caused by evaporation. Again, always make sure the nose doesn’t touch the bottom of the pot and the horns are not covered.

With a water hose, use a wire brush to remove the remaining meat after boiling. Once only the skull and the horns remain, wear latex gloves, grab a toothbrush and coat the skull using 40-50 volume peroxide. Let it sit for 3-5 minutes and rinse it off. You can repeat the process until you achieve the color that you prefer.

Following all these directions and using a sturdy deer mount guarantees you a beautiful hunting memorabilia to add to your man cave or living room. Getting Skull Hooker’s Little Hooker doesn’t only display your trophy beautifully, but it also gives you the ultimate satisfaction of telling others that you did it all on your own. Happy hunting and mounting!

How Taxidermy Got Its Start

It is believed that taxidermy has been around for many centuries. It may even go back to the beginning of man. Saving trophies has always been a favorite pastime of man. When man first began to hunt he would want a trophy of his kill. The preservation methods were poor so there is no clear record of the beginning of taxidermy.

The Egyptians mummified their cats, dogs, and other animals at their death. In a way this is actually a form of taxidermy. It was all about preserving the bodies after death. Many of these mummies of animals have been found along with what is believed to be the owners of the animals.

Ancient Egyptian Mummification

Ancient Egyptian Mummification

During the Middle Ages taxidermy took a serious twist. The preservation methods improved greatly. Birds were often stuffed to use during falconry hunting. Although they were stuffed with some strange materials at times, the skin preservation had improved tremendously.

There is a mounting of a rhinoceros in a museum in Italy that is said to be the oldest mounting in the history of taxidermy. The mounting is believed to have been done in the 16th century. The preservation techniques were good enough that the mounting of the rhinoceros is still in great shape.

Pierre Belon, a naturalist is the first person to have written a book on how to do taxidermy. This book was written in 1555. Other instructions on this subject were later written during the 1600’s. The preservation methods have changed considerably since these books have been written.

Taxidermy became very popular during the Victorian era. People would go on their travels and want a memento of where they had been. Many times this was a mounting of an animal or bird. Also many museums started using mountings in their displays. This gave taxidermists a lot of business. The art of anthropomorphic taxidermy started about this time. This special niche of taxidermy uses animals in poses that would actually be found in humans instead of animals. There is a very famous piece that was done by Walter Potter. In this mounting kittens are posed as if at a tea party having tea and mice.

The 20th century brought about the modern era in taxidermy. Posing animals and birds as they would appear in real life became popular and is still popular today. Some of the well-known taxidermists of the 20th century are Van Ingen & Van Ingen, William T. Horneday, Leon Pray, and Carl E. Akeley. The mountings started having a form placed inside the preserved skin instead of being stuffed with straw and other materials. The forms make it possible to have a more realistic shape and look to the animal. The forms are made to look like the animal would if seen in the wild.

Although taxidermy is not as popular as it was in the Victorian era, it is still an art form which people can appreciate. People still enjoy their trophies and museums still use mounts in their displays. Today the art of preservation has reached its pinnacle and the mounts will last for a very, very long time.

Skull Cleaning Tips

After you’ve created a beautiful European skull mount, you want to keep it clean and flawless-looking. Fortunately, if the mount was cleaned properly, bleached, and given a protective coating when it was made, this will be extremely easy.

Mounts that were given a protective polyurethane or acrylic spray coat are a breeze to keep clean. A simple dusting now and then should suffice, though care should be taken to be gentle, so no teeth or horns are knocked loose, and no bones get chipped. Feather dusters and other gentle, minimal-contact dusters are the best for keeping skull mounts dust free, without having to worry about any further damage. If the mount was not given a protective coat, it should be cleaned thoroughly and given one.

Skull Cleaning TipsIf a skull mount ever gets to the point where it requires further cleaning, a damp rag is the best way to do it. Protective coatings can prevent staining, and any cleaning after the coating is applied needs to ensure that it isn’t accidentally stripped off. Rubbing alcohol, acetone, solvents, or some detergents can cause yellowing, clouding, chipping, softening, or even stripping of the protective layer, so they shouldn’t ever be used. A soft, lint-free cloth barely dampened with some clean water is all that should be used, and care should be taken that the skull is allowed to dry out completely afterwards, to avoid mold, mildew, or insects.

Small spaces between teeth and in small skull cavities can be cleaned using artist’s brushes, pipe cleaners, and the canned air dispensers used for keyboards. These areas shouldn’t be allowed to get wet, so a skull shouldn’t ever be immersed, but these tools can all be used to get into tiny spaces and crevices without using any water. Artist’s brushes come in a wide variety of shapes, sizes, and materials suitable for different parts of a skull, however pipe cleaners have the advantage of being able to be bent into different configurations for cleaning inside long cavities and around corners. However, care should be taken that the hard, wire core of the pipe cleaners isn’t allowed to scratch the skull’s coating, or chip small pieces of bone off.

If any teeth are loose, these can be repaired after dusting with a little bit of carefully applied super glue. Fit the tooth in its socket, remove it, add a small amount of glue, replace the tooth, and let it dry completely. Make sure the brand of glue dries clear, and is guaranteed not to yellow over time. That way, if any glue accidentally makes its way somewhere visible, it won’t be noticeable and detract from the appearance of the skull mount.

European skull mounts are one of the easiest trophies to create and maintain, making them a popular choice for beginners. However, just because they’re easy to take care of doesn’t make them maintenance-free, but with a little common sense care, even an antique skull mount can look just as good as the day it was prepared.

Dangers of Insect Infestation

Even though a preserved hide has had all of the muscle removed from it, been treated, dried, glued, and mounted, that doesn’t mean that something won’t still try to eat it. Moths, dermestid beetles, and cockroaches commonly infest mounted trophies for various reasons, and can ruin even the best taxidermy mount.

Taxidermy Hobbyist - Dangers of Insect InfestationMoths and certain types of beetles can infest woolen clothing in closets, because their larvae enjoy eating the keratinized proteins in hair shafts. Once a hide is mounted, the hair and fur of that animal become a potential moth buffet. While adult moths and beetles aren’t really an issue, the sight of them is probably the first clue that an infestation has occurred. After the larvae get their teeth into mounted animal, bald patches, tracks, and broken hairs will start to become noticeable. Unfortunately, unlike dust or fading, there really isn’t a way to fix that. Methods of handling moth or beetle larvae include temporarily freezing mounts, fumigating rooms, or using special sprays or other chemicals to treat trophies. However, these will only get rid of the larvae; they can’t restore the look of your trophies. Cedar chips, mothballs, and Epsom salts can be used as preventatives, but all have their own limitations.

Though usually associated with cleaning skulls and bones for mounting, dermestid beetles are opportunistic feeders that will move on whatever’s next once the meat is gone. This can include wool clothing, fur coats, or mounted trophies. Signs of an infestation include shed beetle shells, crawling larvae, and signs of damage on mounted trophies. Because dermestid eggs are extremely durable, getting rid of an infestation can be a problem. Boric acid is useful for dehydrating beetle eggs and larvae and causing them to die; while frequent vacuuming can help get rid of larvae, beetles, and eggs. Preventing dermestid beetle infestations mostly consists of keeping a close eye out for the kinds of things they like to eat, and removing any adult beetles before they have a chance to lay eggs.

Cockroaches are opportunistic feeders that will eat fur, glue, and everything in between. Unfortunately, seeing them on or near your trophies (particularly in the light) generally indicates a wide-spread infestation, and the only solution might be to seek professional help. Many roach sprays will damage trophies, so removing bugs manually, sprinkling boric acid around the areas roaches frequent, and fumigating the house as a whole, might be the only viable alternative. Preventing roaches mostly consists of keeping the house clean, fixing water leaks, and keeping any food items in secure, airtight packaging.
Unfortunately, once a mounted trophy has been damaged by infestation, all that can often be done is to prevent further damage. By keeping your home and the room your trophies are kept in clean and inhospitable to bugs, however, you can help keep your trophies in flawless, undamaged condition.

Learning Mammals Taxidermy

Mammals are among the easiest subjects for novice taxidermists to learn. Unlike birds or fish, they don’t require any additional steps

to keep their skins looking realistic, and don’t need to be painted after mounting. However, the term “mammals” is very broad, so it’s important for a beginner to decide exactly what kind of animal they wish to work with first.

Creating a taxidermy mount of a mammal consists of a few steps, regardless of species. First, the animal should be skinned, the eyes removed, and the hide cleaned of muscle tissue. Then, the skin needs to be preserved. After this takes place, this preserved skin can be stretched over a prepared mannequin made of polyurethane foam. Since these mannequins are made from designs sculpted by wildlife artists, they allow even someone with very little knowledge of how to mount an animal hide to create a professional-looking, realistic piece.

Learning Mammals TaxidermyFor the absolute beginner, getting a taxidermy kit is probably the easiest way to learn on one‘s own. These kits come with guides in book or video form that go through every step, from skinning to mounting, and can be an invaluable help to a beginner who doesn’t have the benefit of an experienced taxidermist to learn from. Videos, in particular, are helpful because they can be set up as the taxidermist is beginning the project, and stopped, rewound, or restarted as necessary. Unfortunately, most kits are fairy specific to what animal they are appropriate for, and those that aren’t will still require purchasing the right mannequin and eyes to create a finished project. Most hobbyists, particularly those new to taxidermy, don’t have the money or space to invest in keeping a wide range of mammal mannequin’s on-hand. Therefore, knowing what species, age, and even gender of mammal that is going to be worked with can be a big help when it comes time to pick out supplies.

After the specimen, any supplies, mannequins, and glass eyes have been obtained, the only thing left between a new taxidermy hobbyist and an accomplished taxidermist is patience, time, and practice. Online forums exist for fans of taxidermy, and their expertise can come in very handy for the absolute beginner wondering which animal is best to start with. Best of all, forums can also afford new hobbyists a place to show their finished mounts, get critiques on their technique, and learn how to continue to improve their craft for the future.

Learning taxidermy on mammals might be a bit easier than learning on birds, reptiles, or fish, but the results are no less impressive. With the proper kit, and a bit of instruction and guidance from either professional guides, or other helpful taxidermy hobbyists, even a neophyte can learn to create taxidermy art in no time.

Learning Taxidermy Mounts

Preparing a lifelike taxidermy mount is an artistic achievement, and a means of not only preserving hunting trophies or biological specimens,

but of creating a realistic nature scene. However, like any art form, taxidermy takes some effort to learn. While some taxidermy hobbyists will be lucky enough to know an accomplished taxidermist they can learn from, others will find that kits for creating mounts are an invaluable resource for learning.

Taxidermy kits usually come with a couple key ingredients, though the type of kit and the animal it’s intended for will impact what’s included, so it‘s important to know what type of animal you plan to learn to work with before purchasing the materials. All of them generally include the powders, pastes, or solutions needed to properly preserve the skin of the animal, while some others might include injectable solutions for use on fish mounts, which often require leaving the head and tail of the animal intact. Since fish and birds require some additional considerations that mammals don‘t, beginners are usually recommended to start with mammals, like squirrels.

Learning Taxidermy MountsMannequins themselves may or may not come in a kit. Often, due to the wide range of sizes and poses available for most species, they are sold separately. These are usually made of polyurethane foam, and developed by wildlife artists to be anatomically correct and realistically proportioned. Some mannequins are different for either gender of an animal, so it’s important to know some things about the specific animal you’re going to be working with before you get started, if you don’t intend to keep a good selection of mannequins on-hand. Eyes, for the same reason, are generally not included.

Kits also come with guides, and sometimes video, on how to perform all of the steps of your taxidermy project. Depending on how you learn best, whether you choose a kit with a written guide or a video is up to you. However, video might be a bit easier for hobbyists who “learn by doing,” since it’s easy to turn the video on and work on your project at the same time, pausing and rewinding as necessary. The best guides will show every step of the project in detail, from skinning the animal to mounting it, though general how-tos exist on the internet for novices who need more help in a specific area.

Though it’s hard for a beginning taxidermy hobbyist to choose which animal to learn on first, forums exist online for helping beginners get their feet wet and introduce them to the art of taxidermy. By following the advice of others, developing an idea of what they would like to create, and purchasing a good kit, even novice taxidermists can create lovely, realistic mounts in no time at all.

Waterfowl Taxidermy

Duck and goose hunters are frequently devotees of waterfowl taxidermy, and it’s no mystery why. In the hands of a skilled taxidermist, waterfowl make for beautiful, realistic subjects, and modern mannequins allow even novice hobbyists to pose their specimens in a lifelike fashion.

Waterfowl, like all birds are unique from mammals in that they have feathers. While this seems like a painfully obvious thing to point out, it’s very important to keep in mind that a bird’s skin is almost nothing like a deer or coyote’s. Bird skin tends to be thinner, and very greasy, so most taxidermists end up having to clean it with special degreasing solutions, or even dishwashing liquid. Care also has to be taken when removing skin from legs and wings. These areas are complex and delicate, and it’s easy to damage the skin if extreme caution isn’t exercised.

Taxidermy Hobbyist Duck Waterfowl TaxidermyAfter the skin is removed, cleaned, degreased, and preserved, waterfowl taxidermy requires another step that mammalian taxidermy doesn’t- grooming the feathers. Without following this seemingly-minor step, the end result of the mounted waterfowl will look sloppy and unrealistic. In life, birds groom themselves fastidiously, and the direction of the feathers is controlled by muscles under the skin, allowing the birds to puff up to keep warm or look more threatening. After death, and once all of these muscles have been removed after skinning and cleaning, the feathers will end up sticking up in all sorts of directions. Leaving them be without attempting to groom them back to how they would lie on a live bird can completely ruin the look of an otherwise well-executed mounted bird. Care also has to be taken not to break the larger primary wing or tail feathers while the skin is being prepared, though any broken feathers can be fixed with a tiny bit of fast-drying glue at the end of the process.

After the bird’s skin is cleaned and properly preserved, it can be mounted on a pre-formed polyurethane foam mannequin. It can take up to two weeks for the skin to dry and the mount to “set up” thoroughly, so care should be taken not to disturb the waterfowl taxidermy before then, and to make sure that it‘s kept in an area with adequate airflow, to avoid mold setting in. After the whole process is complete, all the new mount should require is dusting to keep the feathers clean.

Though waterfowl taxidermy requires a few considerations that most other specimens don’t, the end product is always visually stunning, and a really great conversation piece. When all of the right steps are followed, even an absolutely beginner can create a beautiful, lifelike mounted waterfowl on their very first try.

Innovators of Modern Taxidermy

The word taxidermy is of Greek origin “taxi” and “derma”, which means arrangement of skin. Taxidermy is a common term that describes the techniques and methods to reproduce or mount three dimensional representations of dead animals for exhibition or for study purpose. It can be performed on all vertebrates including fish, birds, amphibians, reptiles and mammals. There has been significant improvement in the art of taxidermy over the last century. Taxidermists who are well known for their valuable services in the field of taxidermy are mentioned below

Van Ingen & Van Ingen (1900 – 1998).

Taxidermy Innovators - Van Ingen and Van Ingen BrothersVan Ingen & Van Ingen was South Indian Taxidermy Company located in Mysore founded by Eugene Van Ingen and later run by his three sons Botha, De Wet and Joubert Van Ingen. They were famous for preserving their hunt in the most natural poses. The company was well known for their large number of leopard and tiger mounts that are now spread all over the world in the form of full mounts, head mounts, rug mounts with heads and flat animal rugs. In its heyday the company was regarded as one of the best in taxidermy and served not only the Maharajas of India but also numerous nobles from all over the world.


Martha Ann Maxwell (1831-1881)

Taxidermy Innovator Martha Ann Maxwell

Taxidermy Innovator Martha Ann Maxwell

Martha was a first women field naturalist who acquired and prepared her own samples. In 1860 she traveled to Colorado Territory during the first sign of Pike’s Peak Gold Rush. Her inspiration was the work of a local taxidermist after which she started skinning animals for artistic endeavors. She was a talented hunter who devised modern procedures to skin and mount the remains of animals. It was her work that initiated the basis of modern taxidermy. She learned about the otus asio maxwelliae (Maxwell Owl) including other species not formerly known to exist in Colorado. She presented her collection of preserved birds and animals at both the Centennial Exposition in Philadelphia and Colorado Agricultural Society Fair in Denver. Martha remained a vegetarian all through her life.

Louis Dufresne (1752-1832)
One of the famous naturalists known to travel on the extraordinary journey Astrolabe ship was Louis Dufresne. The ship sailed to islands of Trinidad, Madeira, and Tenerife, rounded at Cape Horn, lingered at Concepción and finally docked at the Hawaiian Islands. It continued its journey along the northern coast of America and all the way up to Alaska. The expedition sailed across the Pacific Ocean and Atlantic Ocean and eventually returned to France with profound knowledge. In early 1790, Dufresne became a well known taxidermist and worked as a curator at Muséum national d’Histoire naturelle in Paris. He introduced the idea of arsenic soap to preserve birds. This technique enabled the museum to put together one of the world’s biggest collection of birds. Dufresne had a private collection in which he compiled approximately 12,000 insects, 1600 bird specimen and nearly 800 eggs from all over the world. His collection included assortment of corals, shells, fossils and amphibians.

Taking Care of Your Trophy

Simply because a hide has been preserved and mounted doesn’t mean that it won’t require any further care. While trophies that exhibit better quality work tend to not require as much maintenance as those with careless or shoddy workmanship, all trophies will eventually need to be taken care of, and possibly even refurbished. However, by taking into account the kinds of things that can cause a trophy to degrade over time, it’s possible to avoid most common types of damage.

Taking Care of Your Trophy An ounce of prevention is worth a pound of cure, so the best way to take care of your trophy is to keep it from needing any extra maintenance in the first place. Keeping mounts in climate controlled areas, away from dampness, and out of sunlight will go far in preserving the integrity of the hide, the hair, and the coloring. Cool, dry places away from light are the best places for trophies. Excessive dampness can lead to mold and mildew, while overly hot, dry conditions can desiccate the hide and cause it to crack or split. Dust and skin oils will discolor fur or hair, so mounted animals should be given frequent gentle dusting, and not touched more than absolutely necessary. While discoloration won’t actually damage the hair, it will make it look dirty, and it can be very, very difficult, if not completely impossible, to remove. Dirty hides don’t look realistic, so poor trophy hygiene can ruin the effect of even the best taxidermy. Like any other piece of expensive decorative artwork, a trophy should be kept and handled the same way one would treat a fine, valuable painting.

After a trophy has been damaged by sun exposure or the effect of time on poorly-done taxidermy, there’s not much that beginning taxidermy hobbyists or laypeople can do, aside from re-gluing the occasional lost eye. Fortunately, however, there are professionals who have a lot of experience in restoring old, museum-quality taxidermy pieces and antique heirloom trophies, and are able to fix some common problems old mounts run into. Cracked or split hides can be re-glued, and sun-faded fur can be dyed back to its original color. However, many of these fixes are complicated, time-consuming, and expensive, and well worth avoiding if at all possible.There’s also a limit to how many times a hide can be dyed or glued, so the longer a trophy can go between needing maintenance, the better.

Taking proper care of a mounted trophy is fairly intuitive. Excessive handling, sunlight, head, and wetness can cause the hide and fur to degrade, so they should be avoided. Keeping this in mind will allow you to appreciate your fine trophies for decades, without having to resort to expensive refurbishing or repairs.